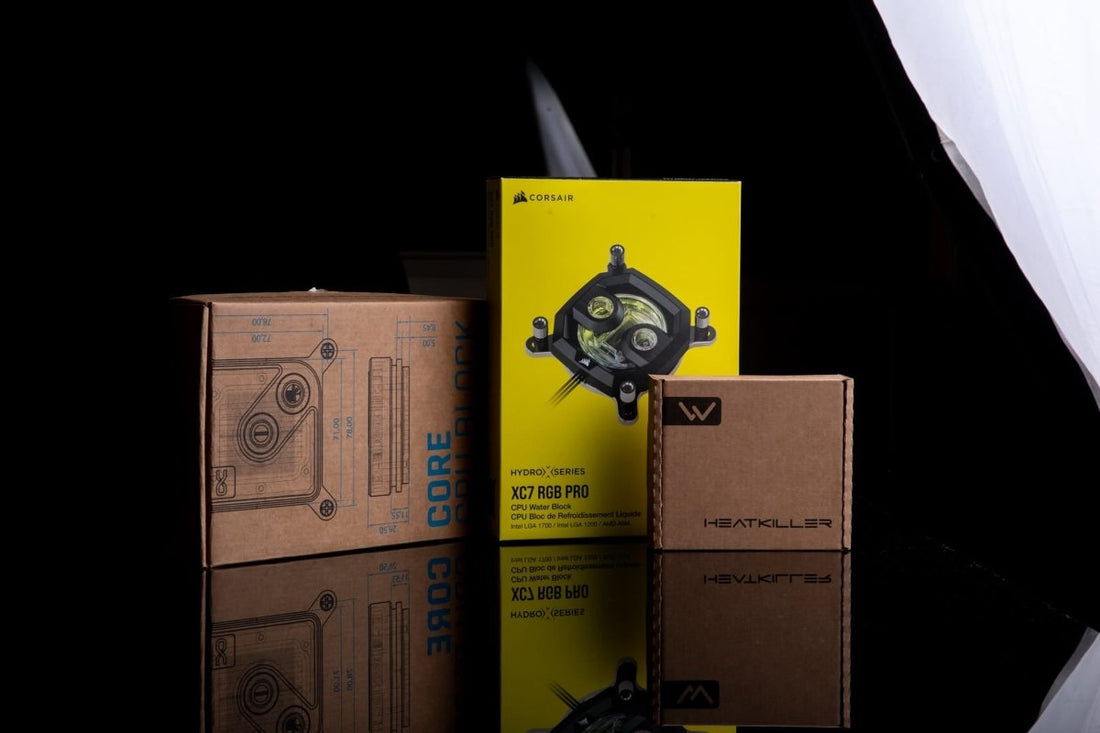
CPU Waterblock Comparison: Corsair XC7 Pro RGB, Watercool Heatkiller IV Pro and Alphacool Core 1
When it comes to choosing a waterblock, it's easy to get lost amongst all the options. Today we look at Corsair's XC7 RGB Pro, the Watercool Heatkiller IV Pros and the newly released Alphacool Core 1 water blocks. Let's find out which of these waterblocks will suit your rig.

Corsair XC7 Pro RGB

Photos were taken during and after the test where there might be some coolant left over
The Corsair XC7 Pro RGB waterblock arrives in a vibrant yellow box that certainly catches the eye. Inside the package, you'll find the block with pre-applied thermal paste and mounting kits for AMD AM4, AM5, Intel 115x, 1200, and 1700 sockets. The installation process is relatively straightforward, requiring access to the back of your motherboard, which is conveniently facilitated by the Lian Li 011 Air case.

The coldplate of the XC7 Pro RGB is made of nickel-plated copper and features 110 microfins. The chamber is constructed from nylon, ensuring compatibility with most coolants. Its transparency allows for a visually appealing view of the internal RGB lighting. Additionally, the mounting frame enables the block's rotation on the CPU, accommodating unconventional layouts. The folded steel construction of the mounting frame provides a lightweight feel. Disassembling the block is straightforward. Unscrew all the screws on the coldplate, and you'll gain access to the internal components for cleaning purposes.

While the quality of the XC7 Pro RGB is decent, it falls slightly short compared to the Watercool Heatkiller and Alphacool blocks.

Installation is relatively simple: Affix the mounting plate on the back, align the mounting frame and block with the motherboard holes, and tighten by hand. The grips may be a bit small, but finger tightening should apply sufficient pressure. However, with larger VRM heatsinks on motherboards, this process can become more challenging. Once the RGB cable is connected, the 16 LEDs create an impressive light show. It's worth noting that there are no markings to indicate the inlet, but the manual suggests that it's located on the right side of the Corsair logo on the block.

Watercool Heatkiller IV Pro

The Watercool Heatkiller IV Pro waterblock is available in Acetal and Copper Nickel tops. Both options feature the same coldplate with 78 microfins, differing only in the materials used for the tops. In today's test, we'll be trying out the acrylic topped version along with the copper nickel top to see if a full-metal construction makes a difference.

These waterblocks come in a relatively plain and subtle brown cardboard box, which minimizes packaging. As they are designed specifically for AMD or Intel platforms, no backplate is required for installation. Keep in mind that these blocks do not include thermal paste, so you'll need to purchase it separately.
 All Watercool water blocks are machine-milled from solid blocks of copper or acetal, with any metal tops coated with a layer of lacquer to protect them from tarnishing. Even the mounting mechanisms are made of thick, laser cut stainless steel plates, providing confidence during installation. The craftsmanship of these blocks is exceptional and immediately evident when held.
 Pictured above is the AMD version which has the AMD mounting brackets
Disassembly of the Heatkiller IV Pro is even easier, requiring the removal of just four screws. These screws also hold the mounting mechanism in place, allowing for easy platform changes. The O-ring has a hexagonal shape, facilitating its placement during reassembly. The block consists of four main pieces: the coldplate, the top and two mounting plates on each side.

Installing the Heatkiller IV Pro involves screwing the stud screws from behind the motherboard, eliminating the need for a backplate. However, an optional backplate can be purchased for additional reinforcement. Once the stud screws are in place, align the block over the top, and it will fit snugly through the mounting holes. The thumbscrews on top secure the block firmly in place during finger tightening. The inlet is indicated by a small arrow on one of the ports.
Once installed, be sure to admire how lit it looks in your rig.
 "Mmmm shiney"
Alphacool Core 1 CPU Block:

The Alphacool Core 1 CPU Block comes in a well-packaged box, cushioned with foam for protection. It includes a bag of mounting parts for both AMD and Intel sockets, as well as a small tube of Apex 17W-mk thermal paste with a spreader.

Featuring a nickel-plated coldplate and a brass top, the Core 1 waterblocks are solid and substantial. The Core 1 introduces a new 3D jetplate design, which ensures even distribution of coolant across the entire coldplate. This was designed with larger heatspreaders and offset cores, offering improved performance compared to traditional designs -Theoretically at least. The black top in this test complements black PCBs, such as the the MSI Z690 Unify-X which is used on our test bench. Additionally, there are RGB versions available, featuring a soft and subtle diffused LED strip.

Disassembly of the Core 1 block involves removing the six screws on the bottom coldplate. It's important to note that one of the screws is shorter and specific to a rounded corner hole. The block features a nickel plated copper coldplate with a brass top and 3D shaped plastic and rubber jetplate.

Installation of the Core 1 block is likely the easiest among the three. Slide the brackets onto the waterblock until they clip, mount the sturdy backplate (for Intel), and secure the block in place. While finger tightening is possible, the option to use a Philips screwdriver for full tightening is a significant advantage. This prevents potential finger injuries on the sharp edges of motherboard VRM heatsinks, particularly in compact builds. The center port serves as the inlet, while the corner port features an engraved "OUT" label indicating the outlet.


The Alphacool Core 1 sitting on the 13600KF, happily idling at 26 degrees
Testing Specifications
- Intel i5 13600KF with Thermalright contact frame
- MSI Z690 Unify-X with stock BIOS settings (PL1 set to 4096W)
- 2x16GB G.Skill Trident Z5 DDR5-6400 C32
- Alphacool Apex 17W/MK Thermal Paste
- EVGA Geforce RTX 3090 FTW3 Ultra with Bykski waterblock and active backplate
- Freezemod 360x30mm Copper radiator with 3 x Be-Quiet 120mm Silent Wings 3 PWM High-speed edition fans
- Freezemod 360x45mm Copper radiator with 2 x Noctua 120mm Industrial 2000 fans and Vardar 120mm Evo 120ER Fan
- Freezemod DDC Pump 800
- Lian Li O11 Air
Testing Methodology
Each waterblock was subjected to a 30-minute OCCT stress test, with Hardware Info logging the results.
The temperatures detected via Intel's DTS was averaged during the final 10 minutes of the test at full utilisation. Before each test, the CPU heatspreader and waterblocks were cleaned, and fresh Alphacool Apex thermal paste was applied. The loops were thoroughly bled and run for approximately 30 minutes prior to the stress test.
All fans and the pump were set to 80% speed.
Results
| Waterblock | Core Temperatures (avg) [°C] | CPU Package [°C] | Core Max [°C] | CPU Package Power [W] | Ambient temperature [°C] | Δ Temperature (CPU Package - Ambient) [°C] |
Δ Temperature (Core avg - Ambient) [°C]
|
| Watercool Heatkiller IV Pro Acrylic Top Clean | 65.83 | 72.35 | 72.69 | 194.1 | 19.6 | 52.75 | 46.23 |
| Watercool Heatkiller IV Pro Nickel Copper Top | 64.29 | 70.63 | 70.54 | 197.66 | 19.8 | 50.83 | 44.49 |
| Corsair XC7 Pro RGB | 68.89 | 73.87 | 73.87 | 198.4 | 19.2 | 54.67 | 49.69 |
| Alphacool Core 1 | 65.19 | 71.05 | 71.19 | 197.38 | 19.6 | 51.45 | 45.59 |
Delta temperatures in the results below are the difference between ambient temperatures and core package. The results amongst the waterblocks are separated by only a few degrees.
However, it's clear that the blocks feature full metal construction are able to push out a slight advantage as the top of the housing is able to transfer more heat into the coolant.
Bottlenecks that may have been experienced include the default Intel heatspreader. Lapping this heatspreader could potentially result in significant improvements. When you think about it, the 3090 was idling at 21 degrees and normally runs at about 43 degree Celcius under the same pump and fan settings during MSI Kombustor's 3D stress test; this test normally pushes the card beyond 370 Watts. The core on the 3090 doesn't not have a heatspreader after all.
Conclusion
All three brands offer waterblocks that perform rather well. While the Watercool Heatkiller and Alphacool blocks are top performers, the Corsair XC7 Pro RGB also provides respectable performance. For casual users, any of these blocks will perfectly, and the choice really comes down to what looks best to you, your budget, or future upgrade plans, especially if transitioning to more powerful CPUs.
For users with high-performance rigs like the i9-13900K or the i9-7950X, a few degrees difference in temperature can be crucial to avoid that thermal throttling mark. In such cases, opting for full-metal waterblocks, such as the Heatkiller IV Pro or the Alphacool Core 1, would be recommended to get the most out of your CPU. The test rig drew around 220 Watts on the CPU on MSI's more aggressive BIOs, which all three blocks handled comfortably during winter.
However, they might face challenges in an non-airconditioned environment during hot Australian summers. With a CPU like the i9-13900K drawing around 285 Watts, the stronger performing waterblocks and higher-end radiators such as the NexXos or Heatkiller series would be ideal.
Ultimately, the decision might also be influenced by the desire for aesthetically pleasing RGB lighting effects shining through acrylic components.
The Alphacool Core 1 series is available from $190 and the Watercool Heatkiller range starts from $140 here
Disclaimer:
This review is entirely self-funded and I wanted to explore what sets some of these waterblocks apart. This review has not been sponsored by any company or individual.